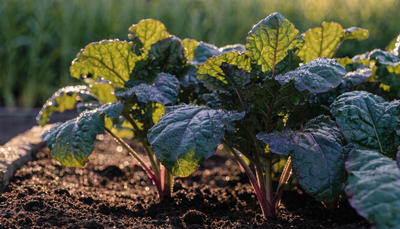
Broccoli has a reputation for being finicky, and that reputation is mostly earned. It's not a plant you can drop in the ground whenever the mood strikes and expect results. Get the timing wrong by even two weeks and you'll watch a beautiful head bolt into yellow flowers before it ever makes it to the kitchen. Get it right — cool soil, living soil, the right nutrients at the right time — and broccoli is one of the most rewarding crops you can grow. Few vegetables come close to the flavor of a head you cut fresh from the garden.
Broccoli is a Brassica, which means it's in the same family as cabbage, cauliflower, kale, and Brussels sprouts. It's a heavy feeder, particularly of nitrogen, and it performs best in cool, moderate conditions — making it a spring and fall crop in most climates rather than a summer one. This guide covers everything you need to grow organic broccoli from transplant to harvest: variety selection, soil building, fertilizing, caterpillar management, and the side-shoot technique that keeps you cutting long after the main head is gone.
Whether you're starting from transplants or direct sowing, growing a main-season crop or overwintering sprouting broccoli, the fundamentals are consistent: healthy living soil, steady nitrogen, good timing, and a watchful eye for cabbage worms.
Choosing the Right Broccoli Varieties
Variety choice has a bigger impact on your success with broccoli than most growers realize. Calabrese is the classic green broccoli — large central head, good side-shoot production after the main head is cut, and reliable across a wide range of climates. Di Cicco is an Italian heirloom that produces a smaller main head but exceptional side-shoot yield; if you want to keep cutting all season, this is one of the best choices available. Belstar is a newer variety bred for heat tolerance and bolt resistance, making it useful in climates where spring can flip to summer heat quickly. Waltham 29 is a classic fall variety with good cold hardiness. Purple Sprouting Broccoli is grown differently from standard varieties — planted in late summer, overwintered, and harvested as masses of small purple heads in early spring before any other brassica is ready.
For spring planting, prioritize bolt resistance — varieties with longer days-to-maturity often perform better because they have more time to develop before heat arrives. For fall, choose varieties with good cold tolerance; a fall-grown head that withstands a few frosts will be noticeably sweeter. Avoid growing broccoli in midsummer heat unless your climate is specifically cool — the flavor, texture, and head quality all decline significantly above 80°F.
Soil Preparation for Organic Broccoli
Ideal Soil Conditions
Broccoli thrives in a rich, fertile, well-draining soil with a pH between 6.0 and 7.0. This range is important not just for nutrient availability but for disease suppression — clubroot, one of the most destructive brassica soil pathogens, is far less severe above pH 6.5. If your soil tests below 6.0, incorporate agricultural lime several weeks before planting. Test your soil pH with a basic kit before every brassica crop rotation.
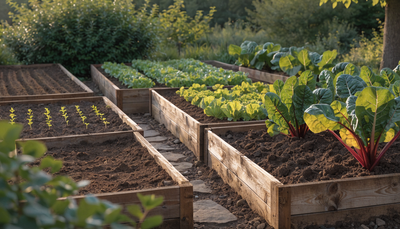
Broccoli is a heavy feeder and rewards deep soil preparation. Loosen the bed to 12 inches and incorporate 2–3 inches of finished compost. Broccoli roots are not especially deep, but good drainage and aeration throughout the root zone support the sustained nitrogen uptake the plant needs. Compacted or waterlogged soil is one of the fastest paths to yellowing leaves and stalled heads.
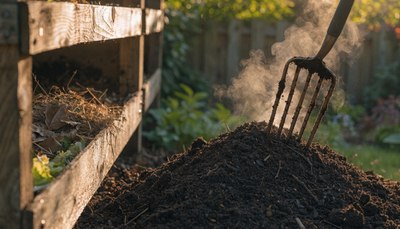
Building Living Soil
The microbial community in your soil directly determines how efficiently broccoli can access nutrients — especially in organic systems where nutrients are bound in organic matter and must be mineralized by bacteria and fungi before plants can use them. A broccoli bed that looks dark and rich but has poor microbial activity will underperform a bed with half the organic matter and an active soil food web.
Before transplanting or direct sowing, inoculate the root zone with a broad-spectrum microbial inoculant. Growganica MICROBES delivers over a billion beneficial microorganisms per application — nitrogen-fixing bacteria, phosphorus-solubilizing microbes, and mycorrhizal fungi that extend the root zone and dramatically increase nutrient uptake. For broccoli, which has sustained, high nitrogen demands from seedling to harvest, a living soil that can mineralize organic nitrogen continuously is the difference between a mediocre crop and an exceptional one. Apply MICROBES at bed preparation and again when transplanting.
Pair your microbial inoculant with Growganica KING KRUSTACEAN worked into the top 4–6 inches at bed prep. KING KRUSTACEAN is a chitin-based calcium supplement that serves two roles in a broccoli bed: it provides the calcium that head density and cell wall integrity require, and the chitin activates systemic resistance in the plant — effectively priming broccoli's natural defenses against the caterpillars and fungal diseases it's most vulnerable to. Calcium-deficient broccoli produces loose, soft heads with poor shelf life; adequate calcium produces the tight, firm domes that are worth growing for.
Planting: Timing and Technique
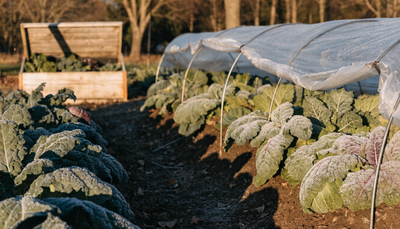
Timing is the single most critical variable in broccoli production. The goal is to have the plant maturing its head during cool weather — ideally with daytime temperatures between 60°F and 70°F. If broccoli matures in heat above 80°F, heads bolt rapidly, develop poor flavor, and may form hollow stems.
Spring planting: Start seeds indoors 6–8 weeks before your last frost date. Transplant outdoors 2–4 weeks before the last frost once seedlings have 4–5 true leaves. Spring broccoli is a race — you want the plant to reach head-forming stage before heat arrives. In most temperate climates this means transplanting in late March or April.
Fall planting: Count back from your first expected frost date. Broccoli needs 70–100 days to maturity depending on variety, plus a few weeks of cool ripening. Start seeds in midsummer (late June to early July in most zones) and transplant 6–8 weeks later. Fall-grown broccoli is almost always better than spring broccoli — it's sweeter, tighter, and more flavorful because it's maturing into cool weather rather than racing away from it.
Direct seeding is possible but not ideal for spring production where timing is tight. It works well for fall crops if you have a long enough cool window. Sow ½ inch deep, spacing seeds 3 inches apart, thinning to final spacing after germination. Transplanting gives you a head start and lets you control timing precisely. Space transplants 18 inches apart in rows 24–30 inches apart. Wider spacing produces larger main heads and more vigorous side-shoot production after harvest.
Plant transplants deeper than they sat in their cell packs — broccoli can be buried up to the first set of true leaves, which gives the stem additional rooting points and better stability against wind.
Watering Broccoli
Broccoli needs consistent moisture throughout its entire growing period. Irregular watering — dry spells followed by heavy rain or irrigation — causes a range of problems: hollow stems, leaf tip burn, poor head development, and premature bolting in stressed plants. Aim for 1–1.5 inches of water per week, adjusting for rainfall. Drip irrigation is ideal because it keeps moisture where broccoli needs it (at the roots) without wetting foliage, which reduces the risk of downy mildew and other fungal issues.
Mulch heavily after transplanting. A 2–3 inch layer of straw or shredded leaves around each plant serves multiple purposes: it holds soil moisture, keeps root-zone temperatures cool during spring warm spells (delaying bolting), suppresses weeds, and reduces soil splash that can spread soilborne disease onto lower leaves. Broccoli roots are shallow; they run dry faster than you'd expect in warm weather, and moisture stress at head-formation time is a major cause of poor head development.
Organic Fertilizing Schedule for Broccoli
Broccoli is one of the highest nitrogen-demand vegetables in the garden. It builds an enormous amount of leaf mass before producing its head, and that leaf mass is the engine that drives head development. Inadequate nitrogen shows up as pale green or yellowing older leaves, slow growth, and small, open heads. Feed consistently and you'll be rewarded with plants that look like they could anchor a seed catalog cover.
Phase 1: Vegetative Growth (Transplant Through Week 5–6)
From the moment transplants go into the ground through the first 5–6 weeks, the priority is building a strong canopy. This is when nitrogen demand is highest. Apply Growganica GOLD VEG every 1–2 weeks as a soil drench, following label rates. GOLD VEG is an organic living-soil fertilizer formulated specifically for vigorous vegetative growth — the kind of rich, dark green leaf production that indicates broccoli is thriving and building the capacity to produce a premium head. Don't skimp here; underfed broccoli in the vegetative phase almost never recovers to produce a satisfying head regardless of what you do later.
Begin foliar applications of Growganica KELP IT REAL once per week from transplant onward. Kelp is far more than a potassium source — it delivers dozens of naturally occurring trace minerals, amino acids, and phytohormones that regulate plant growth and stress responses. For broccoli specifically, kelp supports the production of glucosinolates — the sulfur-containing compounds responsible for broccoli's distinctive flavor and nutritional profile. Kelp-supplemented brassicas produce more glucosinolates, taste better, and handle weather stress with more resilience.
Phase 2: Transition and Head Initiation (Weeks 6–8)
As the plant shifts from pure vegetative growth to head formation, continue GOLD VEG but taper the frequency slightly (every 2 weeks rather than weekly). This is when calcium becomes critical. A firm, tight broccoli head is built cell by cell, and calcium is the structural mineral inside every cell wall. Growganica KING KRUSTACEAN applied as a foliar spray or soil drench every 2 weeks from this point through harvest keeps calcium available as the head develops. Calcium deficiency in broccoli manifests as tip burn (browning of inner head leaves), soft or loose head texture, and poor post-harvest shelf life. Prevention is the only strategy — calcium doesn't move easily within the plant, so you need a steady supply throughout.
Continue weekly KELP IT REAL through this phase. The trace minerals in kelp, particularly boron and molybdenum, are directly involved in the enzyme systems that build the head. Kelp also helps buffer the plant against temperature fluctuations that could trigger premature bolting.
Phase 3: Side-Shoot Production (Post Main Head Harvest)
Most growers cut the main head and move on. That's leaving most of the harvest on the plant. After the central head is cut, broccoli plants — especially varieties like Di Cicco, Calabrese, and Belstar — will produce a flush of side shoots (also called sprouting broccoli) from axillary buds along the stalk. These shoots typically run 3–6 inches long and are tender, often sweeter than the main head, and excellent for stir-fries and salads. A single well-fed plant can produce side shoots for 4–8 weeks after the main harvest.
Resume regular GOLD VEG applications after the main head is cut to fuel side-shoot production. Continue KELP IT REAL. Side-shoot production is essentially a second vegetative and reproductive phase — it responds directly to nitrogen availability and micronutrient support.
Pest and Disease Management
The most significant pest threats to broccoli are caterpillars — specifically imported cabbageworm (Pieris rapae, the white butterfly's larva) and cabbage looper (Trichoplusia ni). Both eat large, ragged holes in leaves and, if not managed, will tunnel into developing heads, where they're impossible to see until you bring the broccoli inside and watch them crawl out in the kitchen sink. Manage them early and consistently.
Row cover is your most effective tool against all flying pests. Apply floating row cover immediately after transplanting and keep it on until heads begin to form. Row cover creates a physical barrier that prevents adult butterflies and moths from laying eggs on your plants. In areas with high caterpillar pressure, row cover alone is often sufficient.
Bacillus thuringiensis (Bt) is the standard organic spray for caterpillar control. It's a naturally occurring soil bacterium that's lethal to caterpillars when ingested but harmless to everything else — people, bees, beneficial insects, soil microbes. Spray every 5–7 days when caterpillars are active, especially after rain (which washes it off). Apply in the evening when caterpillars are actively feeding. Check the undersides of leaves for eggs (tiny yellow ovals, often laid in rows) and young caterpillars, which are pale green and nearly invisible against brassica foliage.
Neem oil as a foliar spray (1–2% solution with a few drops of dish soap as an emulsifier) disrupts caterpillar feeding and reduces egg hatch rates. Apply weekly as a preventive measure during peak butterfly season in spring. Neem also suppresses aphids, which can colonize broccoli in dense clusters on stems and leaf undersides.
Clubroot is a devastating soilborne disease caused by Plasmodiophora brassicae. It creates grotesque, swollen root galls that prevent water and nutrient uptake; infected plants yellow, wilt, and die. There's no cure once established in soil, and it persists for 20 years. Prevent it by maintaining soil pH above 6.5 (lime annually if necessary), never transplanting brassica seedlings from unknown sources, and observing a strict 4-year crop rotation — never grow brassicas in the same bed twice within four years.
Downy mildew appears as yellow patches on upper leaf surfaces with gray-purple fuzzy growth beneath. It spreads in cool, wet conditions with poor air circulation. Avoid overhead watering, improve spacing for airflow, and remove affected leaves promptly.
Harvesting Broccoli
The main head is ready to harvest when the buds are still tight and dark green — before any yellow appears. Each bud on a broccoli head is actually an individual flower bud; once they start opening to yellow flowers, the head is over-mature, the flavor turns bitter, and the texture loosens. Harvest a day early rather than a day late. Heads are typically ready 60–100 days from transplant depending on variety.
To harvest, use a sharp knife and cut the main stem at a diagonal 4–6 inches below the head. This angle prevents water from pooling on the cut surface, which reduces rot at the point where side shoots will emerge. Leave as much stalk as possible — the side shoots will develop from buds along that remaining stem.
Side-shoot harvest technique: Check the plant every 2–3 days once side shoots appear. Harvest shoots when the head cluster is 2–4 inches across and buds are still tight. Cut each shoot with a stem 3–4 inches long. The more consistently you harvest, the more the plant produces — leaving mature shoots on the plant signals it to stop producing new ones. Early morning harvest produces the best flavor and shelf life.
Freshly cut broccoli is dramatically better than store-bought. It's sweeter, more tender, and more nutritionally dense. Use within 2–3 days or blanch and freeze for longer storage.
Common Problems and Troubleshooting
Bolting (flowering before head forms): The most common failure mode in spring broccoli. Usually caused by heat — either the plant was transplanted too late and hit warm temperatures, or an unusual heat spell triggered early bolting. Also caused by transplant shock, inconsistent watering, or insufficient hardening off. Prevention: choose bolt-resistant varieties, time your transplants correctly, mulch to keep roots cool, and water consistently. Once a head bolts, it cannot be reversed.
Hollow stems: A boron deficiency symptom that also indicates too-rapid growth driven by excessive nitrogen. Moderate nitrogen applications, incorporate KELP IT REAL for boron, and ensure consistent moisture. Hollow stems are mostly cosmetic — the head quality is usually unaffected.
Yellow leaves on lower plant: Normal senescence of the oldest leaves — not a problem. But widespread yellowing across the plant means nitrogen deficiency. Resume GOLD VEG applications immediately. Yellowing with purple tints on undersides can indicate phosphorus deficiency, usually in cold soil below 50°F.
Small, loose, open heads: Caused by nitrogen stress, heat, or harvesting too late. Feed consistently, time the crop correctly, and harvest on schedule.
Tip burn (brown leaf margins on inner head leaves): Calcium deficiency or poor translocation during rapid growth. Apply KING KRUSTACEAN as a foliar spray. Also caused by inconsistent watering, which disrupts calcium uptake through the transpiration stream.
Caterpillar damage in the head: Once caterpillars are inside the head, your options are limited. Soak the head in salted cold water for 30 minutes to drive out any insects before cooking. Going forward, apply Bt before head formation — once the head is closed, spray can't reach larvae inside it.
Stunted transplants that won't grow: Often caused by transplant shock, root disturbance, or cold soil. Also check for cutworm damage at the soil line. If the stem is severed at soil level, a cutworm is the culprit. Use cardboard collars around transplant stems for protection.
Continue Growing
If you enjoyed growing broccoli, these guides cover more of the best organic vegetables and crops for cool and warm seasons: