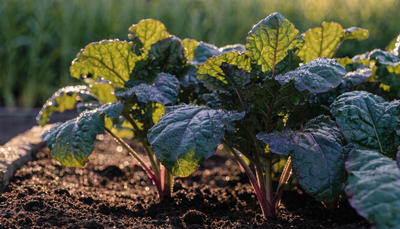
Corn is one of those crops that rewards you for understanding how it actually works. It's not a small-garden vegetable — it takes space, it eats nitrogen like few other plants in the garden, and if you plant it in a single row, it will pollinate poorly and you'll end up with ears full of gaps. But get the fundamentals right and corn delivers in a way almost nothing else does: ears so sweet and fresh that they're best eaten standing over the pot, straight from the husk, before the sugars even have time to start converting.
This guide covers everything you need to grow organic corn successfully — whether you're after sweet corn for the table, popcorn for winter, or flour corn for grinding. You'll learn why block planting is non-negotiable, how to build the soil nitrogen levels that corn demands, the Three Sisters companion planting system that Indigenous farmers perfected over thousands of years, and how to recognize harvest at exactly the right moment. The difference between corn pulled one day too early and corn pulled one day too late is dramatic; this guide helps you hit that window every time.
Corn is a warm-season crop that goes directly in the ground — no transplanting, no indoor starts. It's simpler than it looks once you understand the biology, and the organic approach produces flavor that commercial sweet corn can't compete with.
Choosing the Right Corn Varieties
Corn falls into three main categories for home gardeners, each with different growing requirements, timing, and uses.
Sweet corn is the classic garden variety — harvested at the milk stage (more on this below) when kernels are tender and loaded with sugar. Modern sweet corn varieties fall into three genetic groups: standard (su), sugar-enhanced (se), and supersweet (sh2). Standard varieties have the shortest holding window — the sugars convert to starch within hours of picking, which is why freshly grown standard corn is so dramatically better than anything from a store. Honey and Cream and Peaches and Cream are excellent bicolor standards. Sugar-enhanced types like Kandy Korn hold sweetness longer and are more forgiving. Supersweet varieties like How Sweet It Is have very high sugar content but thinner, sometimes tougher skins — and must be isolated from other corn types by at least 250 feet or they cross-pollinate and produce starchy, mealy kernels.
Popcorn is left on the stalk far longer than sweet corn — until the kernels are fully dry and hard. Strawberry Popcorn produces small, dark red ears and ornamental plants. Tom Thumb is compact and suited to smaller gardens. Allow popcorn to cure on the stalk as long as possible before frost, then bring inside to dry completely before storing.
Flour corn and dent corn are grown for grinding into cornmeal, masa, or animal feed. Bloody Butcher is a striking heirloom dent corn with deep red kernels. Oaxacan Green is a traditional Mexican flour corn excellent for tortillas. These are harvested fully dry, in the dent stage, and have a longer growing season than sweet corn — often 90–110+ days.
Avoid planting different corn types near each other. Corn is wind-pollinated and crosses readily — supersweet corn crossed with popcorn or flour corn produces a disappointing result in all of them.
Soil Preparation for Organic Corn
Ideal Soil Conditions
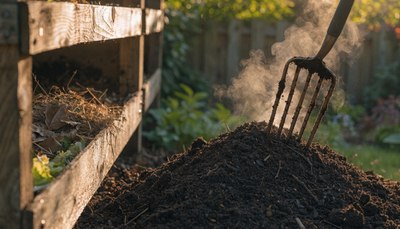
Corn is a heavy feeder that produces an enormous amount of biomass — stalks, leaves, husks, and kernels — all from the soil. It demands soil that is rich in nitrogen, has good drainage, and warms quickly in spring. Target a pH of 6.0–6.8. Soil that is too acidic limits phosphorus and micronutrient availability at exactly the time nitrogen demand peaks. Work your bed to 12 inches deep and incorporate 3–4 inches of finished compost. Corn roots run deep — 3 to 5 feet in good soil — and the plant will use that depth if you give it the structure to do so.
Soil temperature is the non-negotiable variable for corn germination. Corn will not germinate properly in soil below 60°F, and germination is fastest and most uniform at 65–70°F. Cold, wet soil causes seeds to rot rather than sprout. Don't rush the season — wait until soil temperatures are confirmed at 60°F or above before direct sowing. Use a soil thermometer 2 inches deep in the morning to get an accurate reading.
Building Living Soil
Corn's extraordinary nitrogen demand can't be met by a one-time fertilizer application. To sustain the nitrogen throughput that a corn plant needs from seedling to silk, you need a functioning soil food web — one where nitrogen-fixing bacteria are active, organic matter is being mineralized continuously, and mycorrhizal fungi are extending the root zone to access nutrients across a wider soil volume.
Growganica MICROBES inoculates your corn bed with over a billion beneficial microorganisms, including nitrogen-fixing bacteria that work symbiotically with plant roots to pull atmospheric nitrogen into plant-available forms. This is the organic system's answer to synthetic fertilizer — not a single nutrient hit but a living infrastructure that produces nitrogen continuously throughout the season. Apply MICROBES at bed preparation by working into the top 6 inches, then apply again at the base of seedlings once they emerge. Reapply monthly through the season to maintain microbial populations. Corn grown in living soil that's been properly inoculated produces visibly deeper green foliage and substantially larger ears than corn grown in un-inoculated beds with the same organic inputs.
Pair MICROBES with a deep compost incorporation at bed prep. If your soil is heavy clay or compacted, this is the season to invest in breaking it up — corn rewards deep, loose, well-aerated soil more than almost any other vegetable you can plant.
Planting: Timing and Technique
Corn is direct sow only. It does not transplant well — the tap root is sensitive to disturbance, and even minor setbacks during germination can permanently affect yield. There are no shortcuts here. You wait for the right soil temperature, then you plant.
Sow seeds 1 inch deep in warm soil, or up to 2 inches deep in lighter sandy soils. Standard spacing is 8–12 inches between plants in rows 24–30 inches apart. Germination takes 7–10 days at 65°F. Don't thin aggressively — one to two plants per hole is fine. Corn plants support each other structurally as they grow.
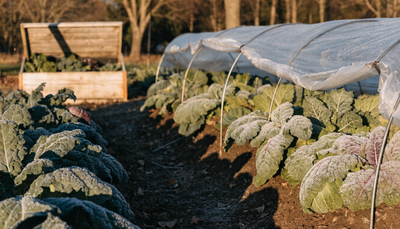
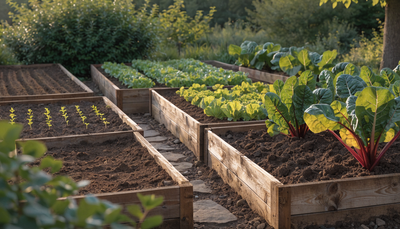
Plant in blocks, not rows. This is the most important single piece of advice in this entire guide. Corn is wind-pollinated — the tassel at the top of the plant releases pollen, which must fall onto the silks below (each silk strand is connected to one potential kernel on the ear). In a single long row, most of the pollen blows sideways out of the planting rather than landing on silks. The result is poorly filled ears with scattered kernels and large gaps. Plant in blocks that are at least 4 rows wide by 4 rows deep — the minimum for adequate wind pollination. Wider blocks produce more uniformly filled ears. If you only have space for a single row of corn, grow something else; it won't pollinate.
For succession planting, sow a second block 2–3 weeks after the first rather than sowing a different variety in the same block. This staggers harvest over several weeks without the cross-pollination risk of mixing types.
The Three Sisters: Companion Planting with Corn
The Three Sisters is one of the most sophisticated companion planting systems developed in agricultural history. Traditionally practiced by the Haudenosaunee (Iroquois) and many other Indigenous nations, it combines corn, beans, and squash in a mutually beneficial guild that provides structure, nitrogen, and ground cover simultaneously.
Corn provides the vertical structure that climbing beans use as a trellis. Beans (specifically nitrogen-fixing legumes) draw atmospheric nitrogen into root nodules, enriching the soil for the nitrogen-hungry corn. Squash sprawls along the ground between the mounds, shading out weeds, retaining soil moisture, and deterring pests with its rough, prickly leaves. The three plants together create a polyculture that is more productive per square foot than any of them grown separately.
To implement Three Sisters: create low mounds 18–24 inches in diameter, 3–4 feet apart. Plant 4–6 corn seeds per mound. Once corn is 4–6 inches tall, plant 4–6 bean seeds around each corn stalk. One week later, plant 2–3 squash seeds on the edge of the mound or between mounds. Thin to the strongest plants as they establish. This system works best in larger garden spaces; in tight urban plots, the squash in particular needs room to run.
Watering Corn
Corn is a high-water plant — a single plant transpires several gallons of water per week in peak summer heat. The most critical watering periods are germination, the period when the plant is tasseling and silking (flowering), and the kernel-fill stage after pollination. Water stress during tasseling and silking directly reduces kernel set — dry conditions at this stage are one of the most common causes of poorly filled ears in home gardens.
Aim for 1–2 inches of water per week depending on temperature and rainfall. Drip irrigation at the base of plants is ideal for water efficiency, but corn responds well to any consistent moisture delivery. Avoid heavy overhead irrigation at tasseling time as it can wash pollen off the tassels before it reaches the silks — but this risk is usually lower than the risk of letting the plant dry out. Keep the soil consistently moist but not waterlogged. Mulch between rows with straw or wood chips to reduce evaporation and moderate soil temperature.
Organic Fertilizing Schedule for Corn
Corn is the most nitrogen-hungry vegetable in the typical garden. A full-season corn crop extracts more nitrogen from the soil than almost any other crop, and in organic systems that nitrogen has to come from a continuously active soil food web, organic matter mineralization, and targeted organic fertilizer applications. Feed consistently or watch your yield drop.
Phase 1: Germination Through Knee-High (Weeks 1–5)
Begin applying Growganica GOLD VEG as soon as seedlings emerge and establish — typically at the V2 or V3 stage (2–3 leaf stages), which is the point where the plant transitions from seed energy to soil-derived nutrition. Apply GOLD VEG every 1–2 weeks through the vegetative period. GOLD VEG's nitrogen-forward organic formula feeds the explosive leaf and stalk growth that defines corn's vegetative phase. Corn with adequate nitrogen during this period develops thick, dark green stalks and broad, dark leaves; nitrogen-stressed corn at this stage produces stunted, pale plants that never fully recover their yield potential regardless of later feeding.
Start foliar applications of Growganica KELP IT REAL once per week from emergence. Kelp provides potassium and the full spectrum of trace minerals that support enzymatic processes throughout the plant. In corn, kelp's natural phytohormone content — including natural cytokinins — supports cell division and root extension, helping young corn plants establish quickly and access soil nutrients across a larger volume. Apply as a foliar spray in the early morning or evening; avoid midday application in full summer heat.
Phase 2: Tasseling and Silking (Weeks 6–9)
As the plant shifts to reproduction — tassels emerging, silks appearing on developing ears — nitrogen demand remains high but the plant also begins needing potassium and phosphorus in larger quantities to support ear development and kernel set. Continue GOLD VEG every 2 weeks. Continue weekly KELP IT REAL. This is also the time to maintain your microbial population with a MICROBES application to ensure the soil food web is fully active as the plant's nutrient demand peaks. Any nutrition stress during silking directly reduces kernel set — every silk strand that doesn't receive pollen or can't support a developing kernel is a kernel gap on your final ear.
Phase 3: Kernel Fill Through Harvest (Weeks 9–13+)
After pollination, the plant's entire energy shifts to filling kernels. This is when Growganica INCREDIBLE BULK delivers its best results. INCREDIBLE BULK is an organic bloom and fruiting booster (0.1-10-25) with high potassium and phosphorus levels that directly support the carbohydrate synthesis, sugar accumulation, and dry matter deposition happening in every kernel as it develops. Apply every 10–14 days from the time kernels begin to set until harvest. For sweet corn, INCREDIBLE BULK feeds the sugar accumulation that makes fresh corn taste the way it does. For popcorn and flour corn, it supports the complete starch and dry matter development that determines quality. Corn with adequate potassium during kernel fill produces fuller ears, firmer husks, and better flavor than corn that ran out of fuel at the finish line.
Continue KELP IT REAL weekly through kernel fill. The trace minerals in kelp support enzyme activity and stress tolerance right through to harvest.
Pest and Disease Management
Corn earworm (Helicoverpa zea) is the most common and damaging corn pest. The adult moth lays eggs on fresh silks; larvae hatch and tunnel down through the silk channel directly into the developing ear, feeding on kernels at the tip. In warm climates, every ear that isn't protected will be infested. Management: apply a few drops of mineral oil or organic neem oil to the tip of the ear immediately after silk browns (when pollination is complete but the ear is still developing). This suffocates eggs and early-stage larvae before they can tunnel deeper. Bt applied to fresh silks also works. Bacillus thuringiensis (Bt) sprays applied to silks every 2–3 days during the pollination window intercept larvae as they hatch. Row cover over entire corn blocks during the silk period is effective but impractical in most gardens.
Corn smut (Ustilago maydis) is a fungal pathogen that replaces kernels with grotesque silver-gray galls that eventually rupture to release black spores. In Mexico it's called huitlacoche and considered a delicacy — earthy, truffle-like, served in quesadillas and tamales. In North American gardens it's usually treated as a disease. Smut infections are triggered by physical damage (insect damage, hail, cultivation) that allows spores to enter the plant. Management is primarily prevention: minimize physical damage to stalks and ears, control insects that create entry points, and remove and destroy any smut galls immediately before they ripen and release spores. Do not compost smut-infected material — incinerate or bag for landfill. Smut spores persist in soil for 5–7 years.
Aphids colonize the undersides of corn leaves and the tassel in large populations, excreting honeydew that leads to sooty mold. Beneficial insects — ladybugs, lacewings, parasitic wasps — usually keep aphid populations below threshold in gardens. If populations are high, a strong jet of water dislodges them effectively; neem oil or insecticidal soap works for persistent infestations. Avoid broad-spectrum sprays that kill the beneficial insects that provide natural aphid control.
Flea beetles create small round holes in young seedlings. Rarely severe enough to affect yield. Row cover at germination prevents damage. Wireworms and cutworms can damage seeds and young stems at soil level; avoid planting into recently tilled sod, where these pests are most concentrated.
Harvesting Corn
Harvest timing is everything with sweet corn. The eating window — the milk stage — lasts roughly 1–3 days per ear depending on variety and temperature. Miss it and the sugars have already begun converting to starch; the kernels are doughy, bland, and chewy rather than crisp and sweet.
How to tell when sweet corn is ready: Silks should be brown and dry — not fresh and pale green. The ear should feel full and firm when squeezed through the husk. Pull back a small section of husk and pierce a kernel with your thumbnail: if a milky white liquid squirts out, the ear is at peak — harvest immediately. If the liquid is watery and clear, it's a few days early. If there's no liquid and the kernel is doughy or pasty, you're a day or two late.
Harvest in the early morning when sugar content is highest and temperatures are coolest. Twist ears downward and away from the stalk — they should come off cleanly. Get them from plant to pot as quickly as possible. The classic rule is to put the water on before you go to the garden. Standard sweet corn loses up to 50% of its sugar content within 24 hours at room temperature after picking; refrigerate immediately if you can't cook it right away.
Popcorn and flour corn are harvested when fully dry. Leave ears on the stalk until husks are papery, brown, and dry and kernels are hard. Pull ears and hang in a dry, ventilated location to cure for 4–8 weeks until moisture content drops below 14%. Test popcorn by popping a few kernels — if they pop fully with few duds, they're ready to shell and store.
Common Problems and Troubleshooting
Poorly filled ears with gaps: Almost always pollination failure from planting in a single row or a block too small for adequate wind pollination. Also caused by water stress during silking, which prevents silks from remaining receptive during the pollination window. Replant in blocks next season; water consistently through the tasseling and silking period.
Pale green or yellow leaves: Nitrogen deficiency — the most common problem in organic corn production. Begin with a tissue that yellows from the leaf tip inward along the midrib on lower leaves; that's classic nitrogen deficiency. Apply GOLD VEG immediately. Maintain consistent feeding throughout the season; don't wait until you see symptoms.
Purple leaf color on young plants: Phosphorus deficiency, typically caused by cold soil (below 55°F) restricting root uptake. Wait for soil to warm. If the problem persists in warm soil, apply SEAPHOOD or increase microbial inoculant activity to improve phosphorus solubilization.
Silk fails to emerge or browns prematurely: Heat stress (above 95°F) or drought. Water deeply through the silking period. In extreme heat events, hand-pollinate by shaking pollen from tassels directly onto silks in the early morning. Brown, dried silk before the ear is mature indicates dehydration, not completion of pollination — maintain irrigation.
Stalks falling over (lodging): Caused by shallow root systems from compacted soil or too-shallow planting, sometimes by wind damage. Corn produces brace roots — aerial roots that angle down from lower nodes into the soil — specifically to anchor the plant. Avoid disturbing brace roots with aggressive cultivation. If lodging has occurred, don't try to right the plants; corn corrects itself with curved growth and typically recovers yield adequately.
Corn earworm in every ear: Standard in warm climates without intervention. Apply neem oil or mineral oil to ear tips immediately after silks brown and repeat preventive measures earlier in the season. Consider selecting varieties with tighter husk tip closure, which deters earworm entry.
Poor germination: Soil temperature below 60°F, seeds planted too deep, or soil too wet. Wait for correct soil temperatures, plant at recommended depth, and ensure drainage. Pre-soaking seeds for 4–6 hours before planting can improve germination speed in marginal soil conditions.
Continue Growing
If you're growing corn, these guides cover more warm-season crops and garden staples that pair well with it in the vegetable garden: