How to Grow Leeks Organically — From Tiny Seedlings to Thick White Stems
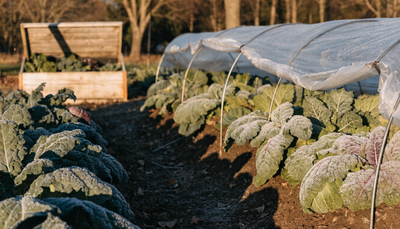
Leeks are the patient grower's reward. They take five to six months from seed to harvest, they spend most of that time looking like nothing much is happening, and then in autumn and winter — when most of the vegetable garden has been cleared — they stand out as one of the most reliable and versatile crops you can grow. A well-managed leek bed extends your fresh harvest deep into winter, with varieties that can be pulled from frozen ground and brought straight to the kitchen.
The technique that defines leek growing is earthing up — gradually mounding soil around the stems as the plants grow to exclude light and produce the long, ivory-white shanks that give leeks their distinctive flavor and appearance. Understand earthing up, master the transplanting technique, and the rest of leek growing is straightforward. This guide covers all of it, from starting seeds in midwinter to harvesting after the first frosts.
Leeks are also one of the more forgiving crops for less-than-perfect growing conditions. They don't demand the richest soil, they tolerate frost better than almost any other vegetable, and they're rarely troubled by serious pest or disease problems. For gardeners who want a dependable, low-drama crop that delivers when little else does, leeks are an excellent choice. Most overwintering leek varieties are reliably hardy in USDA zones 7 and warmer, and can survive deeper cold in zones 5–6 with a thick mulch or row cover.
Choosing the Right Varieties
Leek varieties are broadly classified by season — early, mid, and late — and this matters enormously because it determines when in the year you'll be harvesting. A well-planned bed can provide leeks from August through to March by combining varieties.
King Richard is the dominant early-season variety. It produces long, slim shanks and is ready from late summer into early autumn. It's not particularly cold-hardy — hard frosts will damage it — so harvest before conditions get severe. Its main value is filling the leek gap in late summer when later varieties haven't matured yet.
Musselburgh is the classic mid-season leek — a Scottish heritage variety with a centuries-long track record. It produces thick, stubby shanks with good flavor, tolerates moderate frosts, and is widely available. If you only grow one leek variety, Musselburgh is a reliable default.
Bleu de Solaise is a French heirloom variety that turns a distinctive blue-green color in cold weather — the color is not cosmetic, it's a marker of real cold tolerance. This variety can be harvested through heavy frosts and is one of the hardiest leeks you can grow. Its shanks are slightly thinner than Musselburgh but the flavor deepens with cold.
Bandit is a modern late-season variety bred specifically for overwintering. Very cold-hardy, uniform, and slower to bolt than older varieties. Good choice if you want a reliable late-winter supply without managing heritage lines.
For most gardeners, a combination of King Richard (early) and Musselburgh or Bleu de Solaise (late) covers the season well and requires minimal additional effort.
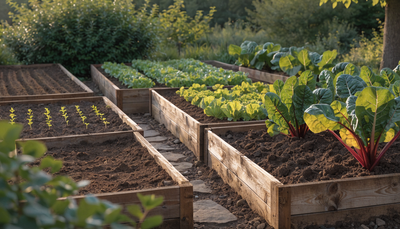
Soil Preparation
Leeks are not especially demanding, but they do best in deep, fertile, well-draining soil. The earthing-up process — which you'll be doing repeatedly through the growing season — requires that soil can be mounded easily around stems without compacting. Heavy clay that clumps and stays wet is the worst case; it also increases the risk of rot at the base of the stem.
Dig the bed over to a spade's depth and incorporate a generous amount of well-rotted compost or aged manure. Leeks are a long-season crop drawing nutrients from the soil for five or six months — organic matter in the soil profile acts as a slow-release bank account. If your soil is on the heavier side, work in some grit or perlite to improve drainage and make the soil more workable for earthing up.
Check pH — leeks prefer 6.5–7.5. Below 6.0 and nutrient availability starts to drop; above 7.5 and you may see yellowing from minor element deficiencies.
Building Living Soil
Leeks spend a long time in the ground and form a deep, fibrous root system that benefits significantly from active soil biology. A week before transplanting, drench the prepared bed with Growganica Gold Microbes. The beneficial bacteria and mycorrhizal fungi help the transplanted seedlings establish quickly by extending the effective reach of the root zone and making soil phosphorus more available — phosphorus is critical for early root development after transplanting.
Mix in SeaPhood at this stage too. SeaPhood's fish-based phosphorus and nitrogen profile feeds both the soil biology and the young transplants during the establishment phase, supporting the root bulking that determines how thick your shanks will eventually become. Work it into the top 6 inches of soil where the leek roots will concentrate.
Planting: Timing and Technique
Starting Indoors
Leeks need a long growing season — 5 to 6 months from seed to harvest. Start them indoors 10–12 weeks before your planned outdoor transplant date. For most temperate climates, this means sowing in January or February for April or May transplanting.
Sow thinly into trays or modules filled with good-quality seed compost. Leek seeds are small and slow to germinate — they need consistent moisture and temperatures around 59–65°F to germinate well. Germination takes 7–14 days. Thin seedlings to avoid overcrowding once they're an inch tall.
Grow on under bright light — a south-facing windowsill or a cold frame in later weeks. Leek seedlings are very cold-tolerant once germinated; they don't need coddling at high temperatures, and a few degrees of chill actually toughens them up. By transplant time, seedlings should be around the thickness of a pencil.
The Dibber-Hole Transplanting Technique
This is one of the most distinctive techniques in vegetable growing, and it's worth doing correctly. The goal is to set transplants deep into the soil so that a long section of stem is buried from the start — giving you a head start on the white shank length before earthing up begins.
- Trim the roots of transplants to about 1 inch and trim the leaf tips to reduce transplant stress.
- Using a dibber (or a thick stick, an old broom handle — anything cylindrical and pointed), push holes straight down into the prepared bed. Make holes 6 inches deep and 6–8 inches apart in rows 12 inches apart.
- Drop one leek transplant into each hole. It should sit in the hole naturally with its roots at the bottom.
- Water in generously. The water draws soil down around the roots and settles the transplant without any manual firming. Do not press soil around the transplant — the loose soil in the hole allows the stem to expand as it grows.
- That's it. The hole slowly fills with soil naturally as rain and irrigation wash it in, and the buried portion of the stem will blanch white over the following weeks.
Transplant on a cloudy day or in the evening to reduce transplant stress, and water in with a dilute solution of Gold Microbes to help roots reestablish quickly after the move.
Watering
Leeks are more drought-tolerant than many vegetables but still benefit from regular watering, particularly in the weeks immediately after transplanting and during dry summer spells when they're actively growing.
In the establishment phase (first 2–3 weeks after transplanting), water regularly to prevent the transplants from wilting. Once established, leeks need water mainly during extended dry periods. Their deep root system gives them access to subsoil moisture that keeps them going through moderate dry spells.
Avoid overhead watering once the plants are in their leek form — water pooling in the leaf axils in cool, humid conditions increases the risk of botrytis. Watering at the base or using drip irrigation is preferable. If you do water overhead, do it in the morning so foliage dries before nightfall.
In autumn and winter, natural rainfall is usually sufficient for established plants. Leeks effectively go into a slow growth phase in cold weather and don't need supplemental irrigation unless conditions are unusually dry.
Organic Fertilizing Schedule
Leeks have a long season with distinct nutrient demands across three phases: early establishment, active summer growth, and late-season stem development.
Phase 1 — Transplant Establishment (Weeks 1–4 After Transplanting)
Root development is the priority immediately after transplanting. Apply SeaPhood diluted into irrigation water once a week for the first four weeks. The phosphorus in SeaPhood supports root establishment, and the fish-derived nitrogen provides gentle feeding that encourages leafy growth without pushing rapid, soft top growth that's vulnerable to stress.
Keep the Gold Microbes active in the soil by avoiding any products that might inhibit soil biology during this phase.
Phase 2 — Active Leafy Growth (Weeks 5–14)
Through summer, leeks need nitrogen to produce the fan of leaves that drives overall plant size and eventual shank thickness. Larger leaves mean more photosynthesis; more photosynthesis means a thicker shank in autumn.
Switch to fortnightly applications of Gold Veg. Its balanced nitrogen-rich formula supports vigorous leafy growth through the long summer growing season. Pair Gold Veg feeding with monthly foliar applications of Kelp It Real — the seaweed-derived growth hormones boost cell division and improve overall plant vigor, making the difference between a moderate and a genuinely productive leek.
This is also the period when earthing up begins in earnest — see the section below. As you hill soil around the stems, you're creating the conditions for blanching; feeding the plant through this phase ensures it has the energy to produce thick, dense tissue in the earthed-up sections.
Phase 3 — Autumn Stem Development (From August Onward)
As temperatures cool and plants shift energy from leaf production toward stem development, ease off the nitrogen-heavy feeds and allow the plants to consolidate. A final application of SeaPhood in early autumn supports the root system through this transition and encourages the dense, firm stems that store and harvest well through winter.
Continue foliar Kelp It Real applications monthly through autumn — the stress-response compounds in seaweed help leeks handle temperature fluctuations and improve cold tolerance in the final weeks before harvest.
Earthing Up
Earthing up — also called hilling or blanching — is the repeated mounding of soil around leek stems as they grow. Excluding light from the stem prevents chlorophyll development, producing the white, tender shank that defines a quality leek.
Begin earthing up once plants are well-established and growing strongly, typically 6–8 weeks after transplanting. Draw soil from between the rows up around the stems using a hoe. The soil should come up to the base of the leaf fan — do not bury green leaf tissue.
Repeat every 2–3 weeks as the plants grow, always bringing the soil up to the base of the current leaf collar. Some gardeners use cardboard collars or sections of drainpipe around individual leeks to achieve even deeper blanching — slip these over the plants as you hill, raising them as the plant grows.
Firm soil lightly around the stems as you earth up but avoid packing it too tight — the aim is to exclude light, not compress the stem.
Pest and Disease Management
Leek Rust
Leek rust (Puccinia allii) is the most common leek disease — orange, powdery pustules appearing on the outer leaves, usually from midsummer onward. It's a fungal pathogen spread by wind. A mild infection is largely cosmetic and won't significantly affect yield — the inner shank remains clean and perfectly edible even when outer leaves are affected.
Severe rust that covers most of the foliage does reduce photosynthesis and can slow plant growth. Organic management focuses on prevention:
- Space plants adequately — the 6-inch spacing in rows and 12-inch row spacing recommended above promotes good air circulation.
- Avoid overhead watering, which spreads spores and creates the humid conditions rust thrives in.
- Remove and bin (not compost) severely infected leaves.
- Some varieties show better rust tolerance than others — Bleu de Solaise and Bandit generally show less rust than King Richard in wet seasons.
There is no fully effective organic fungicide for leek rust once established. Management is about slowing spread and keeping plants vigorous enough to tolerate infection.
Allium Leaf Miner
Allium leaf miner (Phytomyza gymnostoma) is an increasingly widespread pest in temperate climates. The adult fly makes white stippling marks on leaves while feeding; the larvae then tunnel through leaves and down into the stem, creating entry points for rot.
Organic control relies primarily on exclusion — fine mesh or fleece over the crop during the two main flight periods (early spring and autumn) prevents the fly from laying eggs. Inspect regularly for the telltale white flecking on leaf surfaces.
Slugs
Young leek transplants can be damaged by slugs in the first few weeks after planting, particularly in cool, damp conditions. Iron phosphate slug pellets are certified organic and effective. Once leeks are established and growing strongly, slug pressure diminishes — the plants become large enough to outgrow the damage.
Onion White Rot
White rot (Stromatinia cepivora) affects all alliums and persists in soil for decades. Symptoms are wilting, yellowing plants with white fluffy mold at the base. If you encounter it, remove and destroy affected plants immediately and do not grow alliums in that spot for at least 8 years. Good soil drainage and avoiding overfeeding with nitrogen reduces risk.
Harvesting
One of the great advantages of leeks is their flexibility at harvest. Unlike many vegetables that have a narrow window between ready and overripe, leeks can be left in the ground for months and harvested as needed — acting as their own storage system through autumn and winter.
When to harvest: Harvest when shanks have reached a usable size — typically from 1–2 inches diameter, depending on variety and preference. Shanks will continue slowly thickening if left in the ground.
How to harvest: Loosen the soil around the base of the plant with a fork before pulling. Leek roots are surprisingly tenacious — pulling without loosening often damages the shank or snaps the stem at the base. Push the fork in several inches away from the base and lever gently, then pull the leek cleanly from the loosened soil.
Winter harvesting: Late-season varieties (Musselburgh, Bleu de Solaise, Bandit) can be left in the ground through hard frosts and heavy snow. The outer leaves may look battered after severe weather but the inner shank remains perfectly sound. Harvest as needed through winter. If the ground freezes solid, harvest a week's supply in advance and store in the refrigerator.
Signs of bolting: In late winter and early spring, overwintered leeks begin to bolt — sending up a central flowering stalk. Once bolting starts, harvest the remaining plants immediately. The stalk makes the shank woody and inedible as it develops.
Common Problems and Troubleshooting
Thin, grass-like shanks at harvest
Usually caused by starting seed too late (insufficient growing time), overcrowded transplants competing for nutrients, or transplanting seedlings that were too small. Next season: start seed 2 weeks earlier, ensure good spacing (6 inches in the row minimum), and transplant only when seedlings are pencil-thick.
Shanks are white at the top but green throughout most of the length
Not enough earthing up. To produce long white shanks, soil needs to be brought up repeatedly through the season to continuously exclude light. A single mounding early in the season won't produce the long blanch that makes a quality leek. Begin earthing up earlier and do it more frequently.
Yellow outer leaves early in the season
Common causes are nitrogen deficiency, waterlogging, or transplant stress. Feed with Gold Veg if nitrogen deficiency is suspected. Check drainage if yellowing is accompanied by soft, discolored roots. If plants are simply settling in after transplanting, the yellowing often corrects itself once roots establish.
Plants bolting in midwinter
Premature bolting in winter is usually caused by a period of warm weather followed by cold — the temperature fluctuation triggers the plant's vernalization response. Select varieties specifically bred for overwinter reliability (Bandit, Bleu de Solaise) and harvest before late winter if warm spells are forecast.
Soft, rotting base
Typically caused by allium leaf miner damage allowing rot to enter, white rot disease, or waterlogging. Examine the pattern: widespread wilting across multiple plants suggests disease or drainage problems; isolated plants with leaf miner damage on the foliage suggest the pest is the entry point. Improve drainage, practice crop rotation with alliums, and use fleece to exclude leaf miner as a preventative measure.
Continue Growing
If leeks have sold you on the appeal of harvesting through winter when the garden looks bare, or if you're building out a full seasonal growing calendar, these guides cover crops that work well alongside and after a leek bed:
- How to Grow Onions Organically — From Sets to Harvest — fellow alliums that share similar soil and fertility needs, with a quicker growing timeline.
- How to Grow Kale Organically — Complete Beginner's Guide — another winter-hardy crop that occupies the garden through the same cold months as overwintered leeks.
- How to Grow Beets Organically — Root to Greens Growing Guide — a versatile root crop that fills the space left when early leeks are cleared in late summer.
- How to Grow Sweet Potatoes Organically — Complete Growing Guide — a warm-season crop to plant after leeks are harvested in spring, making full use of the well-prepared, fertile bed.