How to Grow Peas Organically — Snap, Snow, and Shelling Peas
Peas are one of gardening's most rewarding quick wins. They go in the ground before your last frost date, they climb, they produce abundantly, and then — just when summer heat arrives — they step aside and let you plant something else. Few vegetables offer that kind of efficient use of prime spring real estate, and few vegetables taste as dramatically different freshly picked versus store-bought. A pea eaten within minutes of harvest is sweet, crisp, and almost floral. The same pea two days later is starchy and dull. If you've only ever eaten supermarket peas, growing your own is genuinely revelatory.
This guide covers all three types — snap peas with their edible, crunchy pods, flat snow peas prized in stir-fries and fresh eating, and shelling peas grown for their swollen seeds. The care fundamentals are nearly identical across types, with differences showing up mainly in harvest technique and timing. We'll walk through variety selection, soil prep (with a special focus on the nitrogen-fixing magic that makes peas unlike almost any other crop), planting windows, support structures, feeding with organic inputs, pest and disease management, and the art of catching the harvest at its fleeting peak.
Whether you have a raised bed, a garden row, or even a few containers on a patio, peas fit. They're cool-season, they're fast, and once you understand a few key principles — inoculate your seeds, don't overdo nitrogen, keep picking — they're genuinely easy to grow well.
Choosing the Right Varieties
The three pea types solve different problems in the kitchen, and growing the right type for how you cook makes a real difference.
Snap Peas
Sugar Snap is still the benchmark — thick, juicy walls, edible pod, deeply sweet flavor. It's a tall climber reaching 5–6 feet, so give it a sturdy trellis. Super Sugar Snap adds improved disease resistance. Cascadia and Sugar Ann are bush types that top out around 2 feet, good for containers or low-maintenance beds. Snap peas were developed in the 1970s from a cross between a snow pea and a shelling pea, and the best varieties still carry that genetic vigor.
Snow Peas
Snow peas are harvested flat, before the seeds develop. Oregon Sugar Pod II is a reliable bush variety. Mammoth Melting Sugar climbs to 4–5 feet and produces heavy yields of wide, tender pods. Golden Sweet is a beautiful yellow-podded variety that's striking in salads. Snow peas have a shorter harvest window than snaps — once the seeds start swelling, pod quality drops fast.
Shelling Peas (Garden Peas)
Alderman (also sold as Tall Telephone) is a heritage climber that produces large, heavy pods and exceptional flavor. Lincoln is a bush type with high sugar content and good heat tolerance — useful for extending harvest into warmer weather. Green Arrow produces double pods and is highly productive per plant. Shelling peas require more effort — you shell them after harvest — but the flavor of fresh-shelled peas has no equal.
Disease Resistance
Powdery mildew is the top disease concern with peas, and variety selection is your first line of defense. Look for varieties specifically noted as mildew-resistant, especially if you garden in a humid climate or plan a fall planting when cool, damp nights accelerate fungal spread. Oregon Sugar Pod II, Cascadia, and Super Sugar Snap all carry useful resistance.
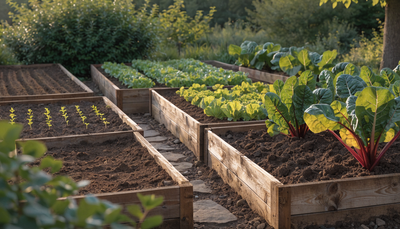
Soil Preparation
Peas are legumes, which means they fix atmospheric nitrogen through a symbiotic relationship with Rhizobium bacteria in their root nodules. This fundamentally changes how you approach soil fertility for peas compared to most vegetables. You don't need a nitrogen-rich soil — in fact, excess nitrogen pushes leafy growth at the expense of pods. What you need is a soil with good structure, adequate phosphorus and potassium, consistent moisture retention, and a thriving microbial community to support the legume-bacteria relationship.
Target a pH of 6.0–7.0. Peas are reasonably tolerant but perform best in this range. Test your soil if you haven't recently — lime corrects acidic soils, sulfur brings down alkalinity.
Work compost into your bed a few weeks before planting. A 2–3 inch layer turned into the top 8–10 inches adds organic matter, improves drainage in clay soils and water retention in sandy ones, and feeds soil biology. Avoid fresh manure or high-nitrogen fertilizers at this stage.
Building Living Soil
The nitrogen-fixing symbiosis in peas is entirely biological — it depends on the right bacteria being present in the soil. In new garden beds, or anywhere peas haven't been grown before, those bacteria may not exist in sufficient populations. The solution is inoculation.
Growganica Gold Microbes delivers a concentrated blend of beneficial microorganisms that establishes a living soil ecosystem. Applied at planting, it activates the microbial partnerships that make legume nitrogen fixation possible — along with mycorrhizal networks that dramatically expand root reach for phosphorus and water uptake. In trials and in practice, inoculated peas consistently outperform non-inoculated ones in pod set and overall yield. This is genuinely one of the highest-return inputs you can apply to a pea planting.
Pair the microbial foundation with Kelp It Real, worked into the planting bed as a soil drench. Kelp provides natural plant hormones (cytokinins and auxins) that stimulate root development, plus a dense spectrum of trace minerals. Peas with robust root systems establish faster and access soil nutrients more efficiently — particularly important in the cool, sometimes cold soils where peas are planted early.
Planting: Timing and Technique
Timing
Peas are cold-tolerant and should go in as early as the soil can be worked — typically 4–6 weeks before your last frost date. Soil temperature of 40°F is the minimum; germination is best at 50–65°F. Don't wait for warm conditions — peas actually prefer the cool. Planting too late means the plants hit their productive phase during summer heat, which shuts down flowering rapidly. The goal is to have peas producing before temperatures consistently exceed 80°F.
In climates with mild falls, a second planting in late summer for fall harvest is very productive. Time it so the main production window falls in cool fall weather — typically 8–10 weeks before your first fall frost, depending on the variety's days-to-maturity.
Seed Inoculation
Before planting, coat seeds with rhizobial inoculant. You can purchase dedicated legume inoculant powder or apply Gold Microbes as a seed soak (check label directions). Moisten seeds lightly, coat with inoculant, and plant immediately — don't let inoculated seeds dry out or sit in sunlight.
Planting Depth and Spacing
Sow peas 1–1.5 inches deep. Plant in double rows 6 inches apart on either side of your trellis, with 2–3 inches between seeds within each row. This double-row trellis approach maximizes production per linear foot of trellis while keeping vines well-supported and aerated.
For bush types, single rows with 3–4 inches between plants work well. Even bush varieties benefit from some support — a length of low fencing or branchy twigs pushed into the soil gives them something to grab and prevents lodging in wind or rain.
Support Structures
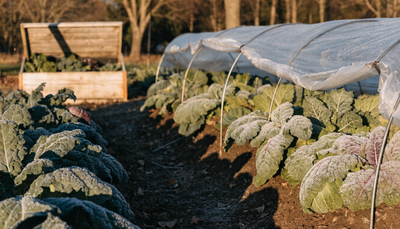
Climbing varieties need serious support — a 5–6 foot trellis of wire or netting. Install it before or at planting so you're not disturbing roots later. Peas climb via tendrils rather than twining, so open mesh or closely spaced horizontal strings work better than coarse wire that tendrils can't grip. They'll find the structure quickly once temperatures warm and growth accelerates.
Watering
Peas need consistent moisture but are sensitive to waterlogging. The goal is evenly moist soil — never bone dry, never saturated. In cool spring weather with regular rainfall, supplemental irrigation may be minimal. As temperatures rise and plants reach peak production, water demand increases.
Critical moisture periods: germination (keep consistently moist until sprouts emerge), flowering (drought stress at this stage directly reduces pod set), and pod fill (moisture shortage during seed development causes stunted, tough pods). Don't let soil dry out during these windows.
Water at the base of plants rather than overhead. Wet foliage promotes powdery mildew, which is already a common problem. Drip irrigation or soaker hoses are ideal. If you water by hand, do it in the morning so foliage dries quickly.
Mulching with straw or wood chips after emergence helps retain soil moisture, moderates soil temperature, and suppresses weeds — all significant benefits in the quick sprint of a pea growing season.
Organic Fertilizing Schedule
Peas occupy an unusual position in the fertilizing landscape: they're self-sufficient for nitrogen if properly inoculated, but they benefit from targeted phosphorus and mineral support at key growth stages. Overfeeding with nitrogen produces lush, dark-green vines with poor pod set — a common mistake. The feeding schedule below works with pea biology rather than against it.
Phase 1 — Pre-Planting Soil Building
Two to three weeks before planting, incorporate compost and apply a soil drench of Kelp It Real at label rate. Kelp's natural cytokinins prep the soil for active microbial growth and ensure trace mineral availability in what are often still-cold spring soils. At planting, inoculate seeds with Gold Microbes and apply a root-zone drench at transplant depth — this kickstarts microbial colonization from day one.
Phase 2 — Pre-Flower Support
Once plants are 6–8 inches tall and beginning their climb, apply SeaPhood as a foliar or soil drench. SeaPhood provides naturally derived phosphorus that is directly relevant to the next phase — root strengthening and the transition to reproductive growth. At this stage, peas are drawing heavily on phosphorus to support rapid vine extension. Do not add nitrogen-heavy fertilizers here; let the rhizobial bacteria do their job.
Phase 3 — Flowering Through Pod Fill
As the first flowers open, apply Vitamin Sea as a foliar feed every 10–14 days. Vitamin Sea's seaweed-derived nutrients and natural plant hormones support flower retention and pod development — the most critical window in the pea growing cycle. Continue applications through peak harvest. A second application of SeaPhood at early pod fill helps fill pods fully rather than leaving seeds underdeveloped.
Pest and Disease Management
Powdery Mildew
Powdery mildew is by far the most significant pea disease, showing up as a white, powdery coating on leaves that progresses from lower leaves upward. It's caused by fungal spores that thrive in warm days, cool nights, and low humidity — which describes late spring and early fall almost everywhere. Once established, it significantly reduces photosynthesis and can end your harvest weeks early.
Management starts with variety selection (choose resistant varieties), timing (early spring plantings often finish before mildew peaks), and spacing (good airflow between plants dramatically slows spread). Avoid overhead watering. If mildew appears, a spray of diluted neem oil or potassium bicarbonate can slow progression but won't eliminate an established infection. The honest answer is that variety choice and timing prevent mildew; sprays merely delay it.
Aphids
Pea aphids — large, blue-green, and soft-bodied — cluster on growing tips and the undersides of leaves. Light infestations can be knocked off with a firm water spray. Serious infestations warrant insecticidal soap or neem oil applied when temperatures are below 85°F. Encouraging beneficial insects (ladybugs, lacewings) by planting flowering herbs nearby is a proactive, long-term approach.
Pea Weevils
These small beetles lay eggs on pea pods, and larvae tunnel into developing seeds. They're primarily a problem in warmer climates. Row covers during flowering prevent egg-laying. Crop rotation helps by reducing overwintering populations in garden soil.
Root Rot
Poor drainage causes root rot, which manifests as yellowing, stunted plants that wilt despite adequate moisture. Raised beds with loose, well-draining soil prevent most cases. Avoid planting peas in the same location more than once every three years — soilborne diseases accumulate with repeated plantings.
Birds
Freshly planted pea seeds and seedlings are irresistible to birds. Wire mesh or bird netting over the bed for the first two weeks after planting protects young plants until they're established enough to withstand occasional attention.
Harvesting
Peas have one of the shortest harvest windows of any vegetable. Once pods reach maturity, quality declines rapidly — sugars convert to starch, pods toughen, and flavor fades. During peak season, plan to check plants daily.
Snap Peas
Harvest when pods are plump, bright green, and crisp. The seeds inside should be visible as slight bumps but not yet fully swollen. Don't wait for maximum size — at that point the pod has lost its signature sweetness and crunch. Pick with a slight upward twist to avoid tearing the vine.
Snow Peas
Pick flat pods as soon as they reach full size but before the seeds begin to swell. You want the pod wall to be tender and the seeds to be barely visible. Overmature snow peas are stringy and tough. The harvest window is literally a matter of a few days per pod — daily picking is essential.
Shelling Peas
Wait until pods are fully rounded and plump but still bright green. Pods that have started to yellow or wrinkle are past peak. The seeds inside should be full-sized but still tender when pressed. Shell immediately after harvest for best flavor — peas begin converting sugar to starch within hours of picking.
Extending Production
The more you pick, the more peas produce. Leaving mature pods on the vine signals the plant to stop flowering and focus on seed maturation. Harvesting every day or two during peak production extends the productive period significantly. When production slows and temperatures are climbing, pull the plants and compost them or chop and till them in — the nitrogen-fixing root nodules add fertility to the soil for the next crop.
Common Problems and Troubleshooting
Plants emerge then stop growing. Cold soil is the most likely cause. Peas germinate in cool conditions but need soil temperatures above 45°F to grow actively. If you planted in frozen or near-frozen soil, seedlings may sit dormant for weeks. Patience usually wins — once soil warms slightly, growth resumes quickly.
Vigorous vines, few pods. Classic excess-nitrogen symptom. This happens when you fertilize peas as you would tomatoes or corn, or when planted in a bed that received heavy nitrogen amendments. Healthy, inoculated peas shouldn't need nitrogen fertilizer. Nothing to do mid-season except wait — most plants will start podding once vegetative growth slows.
Pods forming but not filling. Phosphorus deficiency, drought stress during pod fill, or heat are the typical causes. Address moisture first. If soil phosphorus is genuinely low, a SeaPhood application as a soil drench can help mid-season.
Leaves yellowing from the bottom up. Normal as plants mature and lower leaves senesce. If yellowing happens early and progresses rapidly across the whole plant, check for root rot (dig gently and inspect roots) or assess whether you've been overwatering.
Flowers dropping without forming pods. High temperatures above 85°F are the usual culprit. Once daytime temperatures are consistently this high, peas stop setting pods. There's nothing to do except harvest what's there and pull the plants. This is why early planting is so important — you want pod set to happen in cool weather.
White powder on leaves. Powdery mildew. See the Pest and Disease Management section. Remove heavily infected leaves to slow spread, improve airflow, and apply neem or potassium bicarbonate if the infection is early. If the plants are mostly done anyway, just harvest what remains and remove the plants.
Continue Growing
Peas are just the beginning of what you can grow organically. If you enjoyed this guide, here are a few more to explore:
- How to Grow Kale Organically — Complete Beginner's Guide — another cool-season crop that thrives in similar conditions and extends your spring garden season.
- How to Grow Beets Organically — Root to Greens Growing Guide — an excellent companion crop to peas, planted at the same time and harvested root, leaf, and all.
- How to Grow Onions Organically — From Sets to Harvest — a cool-season staple that pairs well in the garden with peas and fills ground as pea plants finish.
- How to Grow Mint Organically — The Complete Care Guide — a perennial herb that benefits from the living soil you've built for peas and comes back year after year.