How to Grow Swiss Chard Organically — The Cut-and-Come-Again Powerhouse
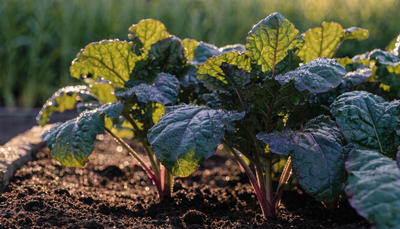
If there's one leafy green that deserves more space in every organic garden, it's Swiss chard. Where spinach bolts at the first hint of summer heat and lettuce turns bitter before July, chard just keeps going — producing glossy, nutritious leaves from late spring through hard autumn frosts and in some climates straight through winter. A single planting can yield harvests for five or six months. Few annual vegetables offer that kind of return on investment.
The "cut-and-come-again" label gets attached to a lot of greens, but chard earns it more genuinely than most. Cut outer leaves down to the base, leave the central growing point intact, and new leaves emerge from the center within days. A healthy, well-fed plant in productive soil will cycle through this process dozens of times across a season. Get the feeding right — especially magnesium, which is critical for chard's deep chlorophyll production and the intense color that makes Bright Lights one of the most photographed crops at a farmers market — and the productivity becomes almost startling.
This guide covers everything from selecting varieties for your specific goals, to building the soil biology that makes organic fertility work, to the exact harvest technique that keeps plants producing at their peak. Whether you're growing a few plants in a raised bed or running a dedicated chard patch, these are the practices that consistently produce high-yielding, nutritionally dense plants all season long.
Choosing the Right Varieties
Chard varieties divide into two broad camps: multi-colored and single-colored types. The differences go beyond aesthetics.
Rainbow and Multi-Colored Varieties
Bright Lights is the gold standard of the category — a mix of plants producing stems in yellow, orange, red, pink, white, and striped combinations, all with rich dark green to bronze leaves. It's visually stunning in the garden and in the kitchen, and it has become a commercial variety widely grown by market gardeners precisely because it sells on appearance alone. Individual plants within a Bright Lights sowing vary slightly, which means planting more gives you a wider color range.
Rainbow Chard seed mixes are similar to Bright Lights and sold under various brand names — performance is comparable. Five Color Silverbeet is an Australian heirloom version with particularly vivid color intensity.
Single-Color and Classic Varieties
Fordhook Giant is the classic white-stemmed chard — large, thick, crumpled leaves on wide cream-white stems, bred for productivity rather than looks. It's a vigorous variety with excellent heat tolerance and is a reliable choice if yield is the priority over aesthetics. Leaves are substantial enough to hold up to braising and sautéing without wilting to nothing.
Ruby Red (also sold as Rhubarb Chard) has deep crimson stems and dark green leaves with red veining. It's striking in salads and performs well in containers. Some gardeners find it slightly less vigorous than Fordhook Giant, but the flavor is excellent.
Lucullus is a pale-stemmed older variety with good bolt resistance — worth seeking out if you're growing in a climate with unpredictable late-summer heat spikes.
Temperature Tolerance — Chard vs. Spinach
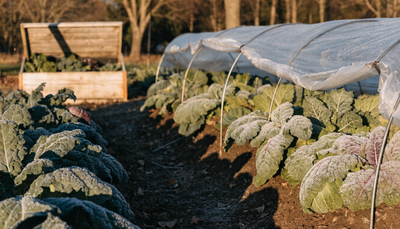
This is one of chard's most underappreciated traits. Spinach is a cool-season-only crop that bolts aggressively once temperatures break 75°F consistently. Chard handles the same temperatures without bolting in all but the most extreme heat, making it productive across a much wider growing window. It's not truly heat-loving — production slows during weeks of 90°F+ heat — but it doesn't bolt, so it recovers when temperatures moderate. It also tolerates light frost (down to around 25°F) with minimal leaf damage, extending the harvest season significantly at both ends. In USDA zones 7 and warmer, chard often overwinters in the ground with simple protection; in colder zones it is grown as a spring-to-fall annual.
Soil Preparation
Chard is moderately deep-rooted for a leafy green, with roots reaching 18–24 inches in well-structured soil. Loose, well-drained soil with good organic matter content is ideal — compacted soil limits root development and produces smaller, less productive plants.
Work the bed to 10–12 inches, removing rocks and breaking up clods. Incorporate 2–3 inches of mature compost thoroughly. Chard's target pH range is 6.0–7.0; outside this range, nutrient availability drops and growth becomes uneven even with good fertility inputs. If you haven't tested your soil recently, a basic pH test before amending is worthwhile — lime raises pH, elemental sulfur lowers it.
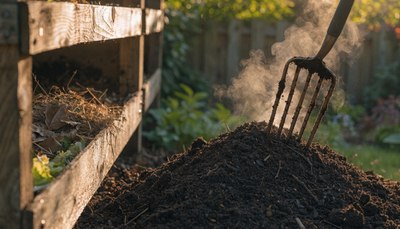
Building Living Soil
Chard responds dramatically to soil biology, particularly when it comes to nutrient cycling between harvests. Each time you cut outer leaves, the plant draws on soil reserves to regenerate. In biologically active soil, nutrients are continuously mineralized and made available; in depleted soil, the plant stalls between cuts and recovery takes much longer.
Before planting or sowing, mix Growganica Gold Microbes into the top 4–6 inches at the recommended label rate. The diverse bacterial and fungal inoculant establishes a working soil food web quickly, accelerating the breakdown of compost and organic matter into plant-available forms. This is especially important for nutrient-dense crops like chard where consistent uptake of iron, magnesium, and calcium directly affects leaf quality and color intensity.
Pair the microbial inoculant with Kelp It Real worked into the surface layer at planting. Kelp's cytokinin content stimulates root branching, while its naturally chelated trace mineral profile addresses micronutrient needs that aren't always covered by compost alone. A kelp-amended bed produces visibly more vigorous chard seedlings — the difference in leaf color at week 3 is consistent and noticeable.
Planting: Timing and Technique
Unlike sunflowers or root crops, chard gives you flexibility: it can be direct sown or transplanted successfully, and it suits both spring and late-summer planting windows.
Direct Sowing
Sow directly in spring as soon as soil is workable and temperatures are above 40°F — chard germinates in soil as cool as 40°F, though 50–75°F gives faster and more uniform germination (7–14 days). In mild climates, spring sowings can begin 4–6 weeks before the last frost date. For a fall/winter harvest, sow 8–10 weeks before the first expected frost.
Chard seeds are actually small clusters of multiple seeds fused together, which means each "seed" you plant can produce 2–3 seedlings. Sow at 6-inch intervals and thin to the strongest seedling once plants are 2–3 inches tall — don't skip thinning, as crowded plants produce small, leggy leaves and poor air circulation invites disease.
Depth: 0.5–1 inch. Keep consistently moist until germination.
Transplanting
Start indoors 4–6 weeks before your target outdoor date. Transplant out at 3–4 inches tall, spacing 9–12 inches apart (closer spacing produces more upright stems and smaller leaves; wider spacing produces larger, more open plants). Harden off over 5–7 days before transplanting. Chard transplants tolerate the process well as long as roots aren't disturbed.
Succession Planting
A single sowing of chard will produce for months, but a second sowing 6–8 weeks after the first provides insurance and extends the fresh-harvest window. For year-round production in mild climates, plant a fall succession in August that will carry through winter under a simple row cover or low tunnel.
Watering
Consistent moisture is more important for chard than the total volume of water. Erratic watering — alternating between dry stress and heavy soakings — causes uneven growth, produces tough fibrous stems, and can trigger premature bolting in warm weather.
Aim for 1–1.5 inches of water per week, adjusting upward in hot, dry conditions. The top inch of soil should never be bone dry for extended periods, but the bed should not stay waterlogged either. Raised beds with good drainage structure are ideal for maintaining this balance.
Water at the base of plants — drip irrigation or soaker hoses are ideal. Overhead watering in humid conditions promotes fungal diseases, particularly during dense growth phases when leaves are close together. If overhead irrigation is your only option, water in the morning so foliage dries before nightfall.
During extreme heat (90°F+), chard benefits from light mid-day watering to reduce heat stress, even if the soil still has moisture — evaporative cooling through the leaves slows stress-related bolting responses.
Organic Fertilizing Schedule
Chard is a leaf crop, and like all leaf crops it responds strongly to consistent nitrogen through its growing life. But nitrogen alone doesn't produce the best chard — magnesium is equally important for maintaining the deep, rich color that signals maximum chlorophyll density, and it's a nutrient that depletes rapidly in heavily cropped beds. A well-balanced feeding program that addresses all three macronutrients plus key micronutrients produces chard that is both more productive and more nutritious.
Phase 1: Establishment (Weeks 1–4)
During the first four weeks, focus is on establishing a strong root system and building the vegetative framework the plant will harvest from for months. Apply Growganica Gold Veg as a soil drench at half strength beginning 10–14 days after germination or transplanting. Gold Veg's balanced, nitrogen-forward formula drives the early leaf and stem development that determines how productive the plant will be at full size. The moderate phosphorus in the formula also supports the root development that enables efficient uptake throughout the season.
Apply foliar sprays of Kelp It Real every 7–10 days throughout this phase. Early-stage foliar feeding bypasses any root establishment lag and delivers trace minerals and natural growth hormones directly to leaf tissue. Plants fed this way during early establishment produce more evenly pigmented, thicker leaves from the first harvest onward.
Phase 2: Active Production (Weeks 4–12+)
This is the main harvest phase — the period when plants are being cut regularly and regenerating repeatedly. Maintain weekly to bi-weekly applications of Gold Veg at full rate to keep up with the nitrogen demand of continuous leaf regeneration. Each harvest cycle draws down nitrogen reserves, and organic nitrogen takes time to mineralize — regular feeding maintains the supply chain.
Add Vitamin Sea to your feeding rotation during this phase — apply every 2–3 weeks as a soil drench or foliar spray. Vitamin Sea's magnesium content is particularly valuable for chard. Magnesium is the central atom in every chlorophyll molecule, and in intensively harvested plants — especially those growing in sandy soils or receiving heavy rainfall that leaches magnesium from the root zone — deficiency shows up quickly as interveinal yellowing on older leaves. Regular magnesium supplementation keeps leaves dense, dark, and deeply colored, and directly affects the nutritional quality of the crop. It's the difference between pale, anemic-looking chard and the deep glossy green-and-red leaves that actually taste as good as they look.
Continue Kelp It Real foliar applications every 10–14 days through this phase, particularly during any heat stress periods — kelp's natural hormones meaningfully reduce bolt susceptibility during marginal weather conditions.
Phase 3: Late-Season Extension (Weeks 12+)
As temperatures cool in autumn, microbial activity in the soil slows and natural nutrient release decreases. If you're pushing chard into a late fall harvest under row cover, maintain regular Gold Veg drenches at half rate every 2–3 weeks and apply Vitamin Sea as the final foliar spray before covering. Cold-weather chard is some of the best of the season — lower temperatures concentrate sugars and produce more tender leaves — and a light feeding program keeps it producing right to the edge of killing frosts.
Pest and Disease Management
Chard is one of the more pest-resistant leafy greens, but several problems appear with enough regularity to warrant attention.
Leaf Miners
The beet leafminer (Pegomya betae) is the most consistent pest of chard. The adult fly lays eggs on leaf undersides; larvae tunnel through leaf tissue producing pale, blistered trails visible from above. Remove and destroy affected leaves immediately — don't compost them. Floating row cover installed at planting time before flies emerge is the most effective prevention. Once larvae are inside leaves, no spray reaches them.
Aphids
Clusters of black bean aphids or peach-potato aphids on new growth and leaf undersides are common during dry spells. Strong water jets knock off light infestations; insecticidal soap applied to leaf undersides handles heavier ones. Encourage parasitic wasps by letting nearby dill or fennel flower.
Slugs and Snails
Seedlings are most vulnerable in the first 3 weeks. Iron phosphate bait applied around the bed at sowing time handles slug pressure without affecting soil biology.
Cercospora Leaf Spot
Circular spots with tan centers and reddish-brown borders, caused by Cercospora beticola. Maintain plant spacing for airflow, avoid overhead watering, remove affected leaves promptly, and rotate chard away from beet family crops on a 3-year cycle.
Downy Mildew
Yellow patches on upper leaf surfaces with gray-purple sporulation below, most common in cool, wet periods. Maintain spacing, water at the base, and remove affected material. Certified organic copper-based fungicides provide control when disease pressure is high.
Harvesting
The cut-and-come-again method is the entire point of growing chard, and getting the technique right dramatically affects how long and how well plants produce.
The Core Rule: Protect the Center
Always cut outer leaves only — never the young, tightly-furled leaves at the very center of the plant. Those emerging leaves are the next harvest, and the growing point they emerge from is irreplaceable. Cut it and the plant stops producing. Cut outer leaves at the base of the stem, close to the plant's crown but without damaging it. This produces a clean cut that heals quickly and stimulates new growth from the center.
Harvest Timing
Begin harvesting when outer leaves are 6–10 inches long — typically 50–60 days from sowing for direct-sown plants. Young chard leaves at this size are tender with mild flavor. Leaves 12 inches and longer are more robust with pronounced earthy, slightly bitter flavor — ideal for cooked preparations. Don't let outer leaves get so large and old that they yellow; this signals the plant is spending resources on aging tissue that isn't contributing to photosynthesis.
How Much to Take
Take no more than one-third of the plant's total leaf area at each harvest. Removing too much at once slows recovery and stresses the plant. A light, regular harvest every 7–10 days maintains a steady supply and keeps plants in the most productive state. For meal planning, 3–4 outer leaves per plant per harvest is a sustainable rhythm for a well-fed plant in peak growing season.
Bolting — Recognition and Response
Chard bolts significantly more slowly than spinach, but it will eventually — typically triggered by a combination of day length and sustained heat. The first sign is a change in the central growth: the leaves at the center become smaller and more pointed, and a flower stalk begins to emerge. Once you see this, cut the flower stalk off immediately at its base. This delays bolting for several weeks in many cases. When regrowth from the base becomes small and tough despite cutting, the plant is done — pull it and replant.
Common Problems and Troubleshooting
Pale, Washed-Out Leaf Color
The most common cause is magnesium deficiency — interveinal yellowing on older leaves (the leaf veins stay green but the tissue between them turns yellow) is the classic symptom. Apply Vitamin Sea as a foliar spray for the fastest correction, and incorporate it into your regular feeding program going forward. Nitrogen deficiency causes overall pale yellowing across the entire leaf, including veins — address with Gold Veg drench. If the soil is compacted or waterlogged, root function is impaired and no feeding program will compensate — fix the drainage first.
Tough, Fibrous Stems
Caused by leaving outer leaves on the plant too long before harvesting, or by heat and drought stress. Harvest more frequently during hot periods — smaller, younger leaves are better quality anyway. Ensure consistent watering, particularly during dry stretches.
Premature Bolting
Triggered by sustained high heat (90°F+), moisture stress, or extreme soil temperature. Provide shade cloth (30–40% shade) during the hottest weeks, maintain consistent moisture, and apply Kelp It Real foliar spray — the natural cytokinins in kelp have a measurable anti-stress effect that reduces bolt susceptibility. Remove flower stalks as soon as they appear. Some varieties (Lucullus, Fordhook Giant) are more bolt-resistant than others — variety selection matters if your climate runs hot.
Poor Germination
Chard seeds germinate across a wide temperature range but are sensitive to planting depth — too deep in cold soil causes rot before germination. Sow no deeper than 1 inch. Multiple seedlings emerging from one planting spot are normal and expected — thin to one plant per spacing.
Stunted Growth Despite Good Conditions
Check for root damage from wireworms or vine weevil larvae, particularly in beds previously holding perennial plants. Healthy chard roots are white to cream, firm, and branching. Brown, soft, or chewed roots indicate a soil pest — treat with nematode biological control applied to moist soil in spring or early autumn.
Continue Growing
Swiss chard fits beautifully into garden rotations with other leafy greens, root crops, and perennials that share its preferences for rich, biologically active soil. These guides cover crops that pair well with chard or follow it in the same bed.
- How to Grow Kale Organically — Complete Beginner's Guide — The closest comparison to chard in terms of cut-and-come-again productivity and cool-season longevity; grow them together for a constant leafy green supply.
- How to Grow Beets Organically — Root to Greens Growing Guide — Chard's direct relative in the Beta vulgaris family, sharing similar soil preferences and feeding needs; rotate them on the same 3-year cycle.
- How to Grow Mint Organically — The Complete Care Guide — A productive perennial that works as a companion planting near chard, repelling certain aphid species and attracting beneficial insects.
- How to Grow Onions Organically — From Sets to Harvest — Excellent companion and rotation crop for chard beds, with complementary soil nutrient needs and different pest profiles.