How to Grow Winter Squash Organically — Butternut, Delicata, and Acorn
Winter squash is not the same as what most people grow in their vegetable garden through summer. Where zucchini and yellow squash are harvested young and tender, winter squash is harvested fully mature — with a hardened skin, a dense interior, and a long storage life that carries you from late summer harvest well into winter. That distinction changes everything about how you grow them. The goal isn't a quick succession of soft fruits picked every few days; it's a small number of large, dense, perfectly ripened squash that sit on your counter for months and improve in sweetness after curing.
The category includes some of the most useful vegetables you can grow — butternut, with its smooth tan skin, sweet orange flesh, and reliable productivity; acorn squash, compact and perfect for single servings; delicata, a thin-skinned variety that doesn't need peeling; hubbard, a massive storage giant; and kabocha, a Japanese-style squash with dense, dry flesh and extraordinary flavor. All of these share the same fundamental growing requirements and respond to the same organic inputs. Master one and you've essentially mastered them all.
This guide covers the full lifecycle: choosing varieties, building the rich, fertile soil that these heavy feeders demand, planting and vine management, organic fertilizing through three distinct nutritional phases, curing for maximum storage and flavor, and troubleshooting the issues that most commonly derail a winter squash crop. Winter squash takes space and time, but the payoff — shelf-stable, nutrient-dense food you grew yourself — makes the investment more than worthwhile.
Choosing the Right Varieties
Winter squash varieties vary significantly in vine size, days to maturity, skin hardness, and culinary use. Match your selection to your available space, climate, and kitchen preferences.
Butternut
Waltham Butternut is the standard — 85–100 days, tan-skinned, sweet orange flesh, excellent storage. Honeynut is a miniaturized butternut developed specifically for home gardens, producing personal-sized fruits with concentrated sweetness. Butterscotch is a productive hybrid with good disease resistance. Butternut is the most versatile winter squash for cooking, roasting, soups, and purées.
Acorn
Table Ace and Table Queen are traditional dark-green acorn types. Honey Bear is a compact, small-fruited variety well suited to smaller gardens. Carnival is a colorful striped variety with good flavor. Acorn squash typically matures in 80–90 days and stores for 2–3 months — shorter than butternut or hubbard but excellent for fall eating.
Delicata
Sugar Loaf and Honey Boat are top performers. Delicata has thinner skin than most winter squash and can be eaten without peeling — just halve, seed, and roast. It matures in 80–100 days and stores for 3–4 months in ideal conditions. Flavor is sweet, nutty, and often described as resembling sweet potato or corn.
Other Notable Types
Red Kuri (Hokkaido) is a teardrop-shaped Japanese variety with deep red-orange skin and extraordinary flavor. Blue Hubbard is enormous — up to 20+ pounds — with blue-gray skin and dense, sweet flesh ideal for commercial-style cooking. Kabocha types have dry, sweet flesh suited to roasting and pureeing. For longest storage, hubbard-type squash win, routinely lasting 4–6 months under cool, dry conditions.
Days to Maturity and Climate Fit
Winter squash needs a long, warm growing season — most varieties require 80–110 frost-free days. In short-season climates, prioritize earlier-maturing varieties (delicata, acorn, small butternut types) and start seeds indoors 3–4 weeks before the last frost date.
Soil Preparation
Winter squash are heavy feeders. Their vine habit and large fruit loads make demands on soil that go beyond what most vegetables require. Vines can run 10–15 feet; roots extend even further. The soil ecosystem you build before planting determines the ceiling on what your plants can achieve.
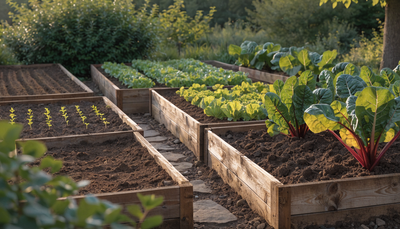
Winter squash grows best in deep, loose, well-draining soil with generous organic matter content. Shallow, compacted, or nutrient-depleted soils produce poor vines with minimal fruit set. Raised beds work exceptionally well — you control the soil composition completely. In-ground beds should be deeply worked, at least 12 inches, with heavy compost incorporation.
Target a pH of 6.0–6.8. Amend acidic soils with lime several weeks before planting. Overly alkaline soils can be corrected with sulfur, but this takes time — test and address pH at least a season ahead if possible.
Building Living Soil
The biology in your soil is as important as its chemical composition for winter squash. Mycorrhizal fungi extend root reach by orders of magnitude, enabling vines to access water and phosphorus from a much larger soil volume than roots alone could reach. Without this fungal partnership, even well-fertilized soil underperforms.
Growganica Gold Microbes establishes the microbial ecosystem that large-fruited crops like winter squash depend on. Applied at planting in the root zone, it inoculates the soil with beneficial bacteria, mycorrhizal fungi, and supporting microorganisms that unlock nutrients from organic matter and extend root function across the full vine run. Winter squash responds dramatically to mycorrhizal inoculation — you'll see faster establishment, more vigorous vines, and better fruit set compared to unamended soil.
To build the physical soil structure that supports this biology, incorporate King Krustacean into your pre-planting bed preparation. This crustacean-derived amendment provides chitin — a natural compound that stimulates beneficial soil biology while suppressing harmful pathogens — along with calcium and slow-release nutrients that feed plants and microbes throughout the season. Work it into the top 8–10 inches of soil 2–3 weeks before planting so microbial activity has time to process it.
Planting: Timing and Technique
Timing
Winter squash is frost-tender and needs warm soil. Plant outdoors only after all frost risk has passed and soil temperature is consistently at or above 60°F (65°F is ideal). In most temperate climates, this means mid-spring to early summer planting. Planting too early into cold soil leads to slow germination, poor seedling vigor, and vulnerability to soil pathogens.
Count backward from your first expected fall frost. You need the days-to-maturity number plus an extra week or two for fruit curing on the vine. If your first fall frost is October 1 and you're growing a 95-day butternut, you need to have seedlings in the ground by around June 25 at the latest — earlier is better.
Starting from Seed
In shorter-season climates, start seeds indoors 3–4 weeks before the last frost date in 4-inch pots. Squash doesn't transplant as readily as some crops — roots are sensitive to disturbance, so use biodegradable pots you can plant without disturbing roots, or be careful transplanting. Direct sowing is preferable where the season allows.
For direct seeding, sow 2–3 seeds per hill or 1 inch deep in rows, then thin to the strongest plant once seedlings have two true leaves. Sowing in hills (slightly mounded soil, 3–4 seeds per group) improves drainage around the stem and concentrates fertility.
Spacing
Standard vining varieties need substantial room: 4–6 feet between plants in a row, with rows 8–10 feet apart. In smaller spaces, train vines in a single direction to maximize use of available area. Bush and semi-bush varieties (like Bush Delicata or Bush Acorn types) can be planted 3–4 feet apart and stay more compact.
Vertical training is possible for smaller-fruited varieties — grow up a sturdy trellis or fence and support individual fruits with mesh slings as they develop. Not practical for hubbard or large butternut, but works well for acorn, delicata, and small kabocha.
Watering
Winter squash has a large, extensive root system that makes it more drought-tolerant than many vegetables once established — but this doesn't mean it can be neglected. Consistent moisture during the vegetative growth phase and fruit development is essential. Water stress during fruit fill leads to small, misshapen squash with less developed flesh.
Water deeply and less frequently rather than shallowly and often. Deep watering encourages roots to grow deep where soil moisture is more stable. A thorough soaking once or twice a week in the absence of rain (more in sandy soils or high heat) is better than daily light irrigation.
Avoid overhead watering. Wet leaves are an invitation to powdery mildew and other fungal diseases. Drip irrigation or soaker hoses laid at the base of plants are the ideal approach. If you hand-water, do it at the base of the stem and in the morning.
As fruits reach full size and begin ripening (skin starts to harden and color shifts), reduce watering slightly. Too much moisture at this stage can delay skin hardening and in some conditions contribute to rot at the blossom end.
Organic Fertilizing Schedule
Winter squash are heavy feeders with three distinct nutritional phases. Underfed plants produce poor vine growth, fail to set fruit, and yield small, underdeveloped squash. An organic approach uses slow-release soil amendments and targeted inputs to match feeding to what the plant needs at each stage.
Phase 1 — Establishment and Vine Growth (Weeks 1–4)
Prioritize root development and establishing vigorous vines. At planting, apply Gold Microbes directly in the planting hole and as a root-zone drench. Once seedlings are actively growing (about two weeks after emergence), begin biweekly applications of Gold Veg, Growganica's organic vegetative-phase formula. Gold Veg delivers the nitrogen, phosphorus, and trace minerals needed to build a strong vine framework — the infrastructure that will support fruit production later. Continue Gold Veg applications through the first month of active growth.
Phase 2 — Flowering and Fruit Set (Weeks 5–8)
Transition from nitrogen-forward feeding to supporting pollination and early fruit development. Reduce Gold Veg applications and introduce Kelp It Real as a foliar spray every 10–14 days. Kelp's natural plant hormones (cytokinins, gibberellins, and auxins) support flower development, improve pollen viability, and help the plant retain the flowers that will become squash. This is a critical transition point — squash plants set far more male flowers first before producing females; kelp applications during this window support the shift to female flowering and successful fertilization.
Hand-pollinate if necessary. If fruit set is poor despite abundant flowers, check for pollinator activity. Early morning, transfer pollen from male flowers (narrow stem, no mini-fruit at the base) to female flowers (small proto-squash at the base) using a small brush or by touching the centers of the flowers together.
Phase 3 — Fruit Fill and Maturation (Weeks 8–Harvest)
Once small squash are set and visibly growing, switch to a fruit-development feeding focus. Apply Incredible Bulk according to label directions every 10–14 days. Incredible Bulk is specifically formulated to support fruit sizing, density, and quality — the inputs that matter when you're trying to fill out large butternut, hubbard, or kabocha fruits to their full potential. Continue Kelp It Real foliar applications alongside Incredible Bulk through this phase to maintain plant health and support late-season nutrient uptake. Stop all fertilizing 2 weeks before anticipated harvest to allow the plant to direct all energy to fruit maturation.
Pest and Disease Management
Powdery Mildew
The most common disease of squash family plants. White, powdery patches appear first on older leaves and spread upward. It's caused by fungal spores and is worst in conditions of warm days, cool nights, and low humidity — common in late summer. Unlike many fungal diseases, powdery mildew doesn't need leaf wetness to spread; spores travel on wind.
Prevention focuses on variety selection (many modern butternut and delicata varieties have partial resistance), good plant spacing for airflow, and avoiding overhead irrigation. Once mildew appears, remove heavily infected leaves and apply neem oil or a diluted baking soda spray (1 tablespoon per gallon of water with a few drops of dish soap) to affected areas. Complete elimination is difficult, but slowing spread preserves productive capacity long enough to ripen fruit.
Squash Vine Borer
This is the most destructive squash pest in North America. The adult is a clear-winged moth that lays eggs at the base of stems; larvae bore into the vine and feed internally, causing sudden wilting. By the time damage is visible, the larvae are already inside. Prevention is critical: row covers until flowering begins prevent egg-laying, yellow sticky traps near plants catch adults, and wrapping the base of stems in foil or covering with soil deters egg-laying. If borers are present (look for frass — sawdust-like debris at the base), slit the vine, remove larvae, and bury the damaged section to encourage new rooting.
Squash Bugs
Gray-brown bugs that cluster on leaves and stems, piercing and sucking plant tissue. They're difficult to kill once adult and easier to manage as eggs or nymphs. Check the undersides of leaves regularly — squash bug eggs are small, bronze-colored, and laid in clusters. Remove and destroy egg clusters and nymphs by hand. Neem oil or pyrethrin sprays help control populations if applied when nymphs are small.
Cucumber Beetles
Striped or spotted beetles that chew leaves and transmit bacterial wilt. Row covers prevent access. If beetles are present, neem oil provides some control. Remove the row covers once female flowers appear to allow pollination.
Harvesting and Curing
Signs of Maturity
The timing of harvest for winter squash is not about softness — it's about full maturity, measured by skin hardness, vine condition, and surface color. A mature butternut should have fully tan skin with no green undertones. Acorn squash are ready when the underside (the part touching the ground) turns orange. The vine stem should be dry, corky, and beginning to brown. Pressing a fingernail into the skin should leave no dent — if the skin dents, the squash needs more time.
Leave squash on the vine as long as possible, ideally past the first light frost (frost sweetens the flavor of many types). Harvest before a killing frost that would damage the flesh.
Curing — Essential for Storage and Flavor
Curing is the step most home growers skip, and it's a significant mistake. After harvest, bring squash indoors (or to a warm outdoor location) at 80–85°F with moderate humidity for 10–14 days. This process hardens the skin, heals any superficial cuts or abrasions, and converts starches to sugars — genuinely improving flavor over what you'd taste immediately after harvest.
After curing, move squash to cool (50–55°F), dry, dark storage. Do not store in the refrigerator — cold temperatures damage squash cell walls and shorten storage life. Under proper conditions, butternut lasts 3–6 months, hubbard up to 6 months, and delicata 3–4 months.
Cutting and Handling
Always leave at least 2–3 inches of stem attached when harvesting. Squash without stems rot from the stem end quickly. Cut with a sharp knife or pruning shears — don't snap or twist, which damages the vine unnecessarily and can tear the stem from the fruit.
Common Problems and Troubleshooting
Vines wilting suddenly. Check the base of the vine for squash vine borer frass (grainy, orange-brown material). If present, slit the stem, remove larvae, bury the damaged section in moist soil, and water well. Plants sometimes recover. If no borer signs exist, check soil moisture and root health — sudden wilt can also indicate root disease in waterlogged soil.
Many flowers but no fruit setting. Most likely a pollination issue. Winter squash requires pollinator transfer of pollen from male to female flowers. If pollinators are absent or rare in your garden, hand-pollinate morning flowers yourself. Also confirm you have both male and female flowers present — early in the season, most flowers are male. Give it 2–3 weeks before worrying about fruit set.
Small, shrunken fruit that stops growing. Failed pollination causes this — the fruit begins to develop but, lacking seed development, aborts. Encourage pollinators, hand-pollinate, and ensure male flowers are available when female flowers open. Fruit set problems are also worse in extreme heat or cold.
Yellow leaves on otherwise healthy plants. Some lower-leaf yellowing as plants mature is normal. Widespread yellowing on the whole plant suggests nitrogen deficiency (add Gold Veg during vegetative phase), iron deficiency (often linked to high pH), or root damage from borers or disease. Diagnose by location of yellowing, pattern of spread, and inspection of the root zone.
Squash rotting on the vine before mature. Blossom end rot appears as a sunken, dark area opposite the stem. It's caused by calcium deficiency, usually secondary to inconsistent watering that prevents calcium uptake even when calcium is present in the soil. Consistent irrigation is the fix. Ensure King Krustacean was incorporated at planting — its calcium content supports cell wall development throughout fruit development.
Stored squash rotting in weeks. Skipped curing, insufficient stem, or damage during harvest. Check that squash were cured properly at 80°F for 10–14 days, that at least 2 inches of stem remain, and that storage conditions are cool, dry, and dark. Inspect stored squash every few weeks and use any that show soft spots or mold first.
Continue Growing
Winter squash fits naturally into a kitchen garden alongside other heavy-producing vegetables. Explore these guides for crops that complement your squash bed:
- How to Grow Pumpkins Organically — From Seed to Harvest — pumpkins are essentially winter squash with the same growing requirements; this guide covers the nuances of pumpkin-specific varieties and curing for ornamental and culinary use.
- How to Grow Sweet Potatoes Organically — Complete Growing Guide — another warm-season, long-harvest, heat-loving crop with a similar curing process that transforms freshly dug tubers into something far sweeter.
- How to Grow Cantaloupe Organically — Sweet Muskmelons from the Garden — a vining crop in the same cucurbit family that shares similar soil prep, feeding phases, and pest management strategies.
- How to Grow Beets Organically — Root to Greens Growing Guide — a productive, space-efficient crop for planting in the cool margins of your growing season around the squash timeline.